Simulating scenarios and running similar tasks across machines in different locations could be quite cumbersome. We might require to either test an application from different sites or automate a process which has to run from different browsers, operating systems and machines, across locations around the globe. The catch is, all at the same time. How would you approach this scenario? Are you imagining a Hub and Spoke kind of arrangement for this? Exactly. This would require someone who could facilitate the Hub and Spoke model. Would you be surprised if that was selenium? We all only knew Selenium as a tool for automating verifications and validation of software.
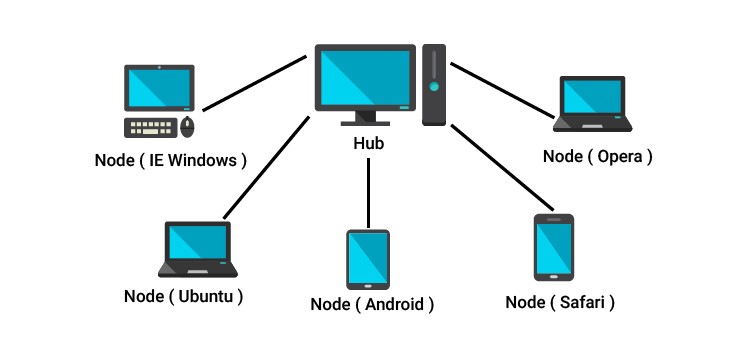
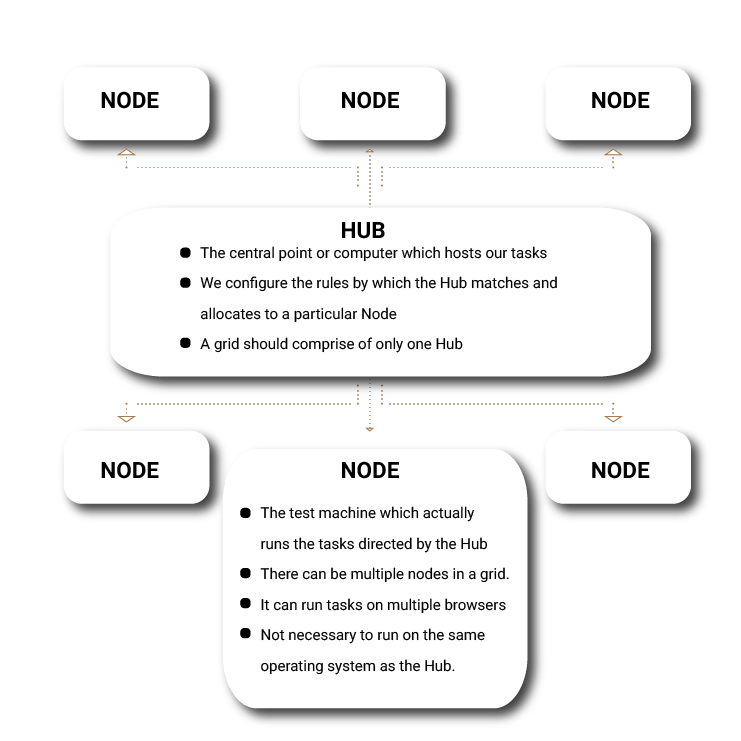
Selenium Suite encompasses this powerful feature called ‘Selenium Grid’. Selenium Suite works on a Hub and Node model. Here we just have to run the particular test or a task on a single machine called the Hub. But the execution is done by different machines called the Hubs.

With the availability of the powerful Selenium Grid, you have to now decide whether you need to go for this feature or not. Let me help you decide.
Ask these questions yourself.
- Am I required to run tests or tasks from different browsers or different operating systems all at the same?
- Do I have multiple tests or tasks that can be executed parallelly, so I save time?
If your answer is yes, you can go ahead using Selenium Grid for your requirement. Since we have now decided, let us see how to use Selenium Grid. At eGrove, we had used Selenium Grid in one of our python applications. So I will also try to throw some light on How to use Selenium Grid in Python.
First, we will try to understand the selenium grid architecture.

With different nodes connecting to the hub, all on different machines, they can now run a task or test each, thereby saving a lot of time and dispenses with the need for frequent human intervention.
We will be using Grid version 2 to demonstrate the steps and implementation in this article, since it is the advanced and latest version of Selenium Grid. Grid version 2 now supports automation through WebDrivers also. Grid 1 had supported only Selenium RC commands and scripts. Grid 2 has also now added the ability to assign up to 5 browsers to a Remote Control.
Read also: Python Technology To Build Highend Web Application
Use of Selenium Grid in a Real Time Scenario:
John is a registered buyer with multiple suppliers’ portals. John has to regularly keep looking at the new arrivals section for a certain category of products and order them. He also needs to simultaneously update his warehouse provider with the details of the expected date of arrival of those products. Once he has placed the orders, he has to add these products on his eCommerce website. Since, his USP has been offering latest products with same day delivery; he has to have this mechanism to support his premium customers. But, he is looking to automate these repetitive processes to save time and focus on other avenues to boost sales.
This is when eGrove stepped in and offered its expertise in automation. We had setup a Hub which would host these tasks and create instances of them on multiple nodes based on certain rule definitions. The entire operation was automated using Selenium Grid and Python which would have required frequent human invention otherwise.
This is just an example on how we had used Selenium Grid to automate tasks. Let’s now get our hands dirty and work on setting up Selenium Grid and writing the Python codes behind them.
1.Download selenium standalone server, Create a local folder at ~/selenium and copy or move jar to that path:
$ mkdir ~/selenium
$ cd ~/selenium
$ wget https://bit.ly/2zm3ZzF
$ mv selenium-java-3.141.59.zip ~/selenium/
2.Download and install selenium WebDriver bindings for Python here:
pip install selenium==3.143.Download chrome driver from (This is for browser related interactions) and copy it to ~/selenium, also create python file for unit tests:
$ wget https://chromedriver.storage.googleapis.com/75.0.3770.8/chromedriver_linux64.zip
$ unzip chromedriver_linux64.zip
$ touch selenium_unittests.py
Create your unittest file and run it.
Below is a small example to validate the Title of a particular website and to automate a simple search on a website.
Open selenium_unittests.py in your favourite text editor like:
$ gedit selenium_unittests.py & or
$ vim selenium_unittests.py
from selenium import webdriver
from selenium.webdriver.common.keys import Keys
driver = webdriver.Chrome()
driver.get("https://github.com")
print(driver.title)
assert "GitHub" in driver.title
elem = driver.find_element_by_name("q")
elem.send_keys("testname")
elem.send_keys(Keys.RETURN)
assert "No results found." not in driver.page_source
driver.close()
Save the file. Open another terminal and execute the following instructions:
$ cd ~/selenium
$ java -jar  selenium-java-3.141.59.jar
Open another terminal and run your python script:
$ cd ~/selenium
$ python selenium_unittests.py
Grid
Set up a grid with many nodes for different browsers and run many instances of our example in a distributed and concurrent manner.
Set up environment:
Run the standalone server in a hub mode (open new terminal first):
$ cd ~/selenium
$ java -jar selenium-server-standalone-2.49.1.jar -role hub
After that we will see where our nodes should register themselves: INFO – Nodes should register to https://{{ip or host}}:4444/grid/register/ We can register now two nodes (do it in two different terminals):
java -jar selenium-server-standalone-2.49.0.jar -role node -hub https://{{ip or host}}:4444/grid/register/ -port 3456

java -jar selenium-server-standalone-2.49.0.jar -role node -hub https://{{ip or host}}:4444/grid/register/ -port 4567
Ok now we have two nodes registered to our grid.
Remote selenium server
However selenium server does not have to be on the same machine, so we need a way to run our test remotely. The only thing we have to change is the instantiation of a driver. We change it to look like this:
driver = webdriver.Remote(
   command_executor='https://{{ip or host}}:4444/wd/hub',
desired_capabilities={'browserName': chrome, 'javascriptEnabled': True})
This is an example to execute multiple times using bash script
Create bash script grid.sh and edit it to contain:
#!/bin/bash
python selenium_unittests.py &
python selenium_unittests.py &
python selenium_unittests.py &
python selenium_unittests.py &
python selenium_unittests.py &
Your can open the selenium hub log and see that the tests are distributed through different nodes:
INFO – Trying to create a new session on node https://{{ip or host}}:4567
INFO – Trying to create a new session on node https://{{ip or host}}:3456
Looking for dedicated python developer or need help on automating tests / specific tasks, please reach out to us at sales@egrovesys.com


Add comment